Hey Python Programmers, In this Post we will Be Creating Something Different, After Bumping Hands on Keyboard we are Finally Converting Our Software To Hardware.
What is Arduino?
Arduino is an open-source hardware and software company, project, and user community that designs and manufactures single-board microcontrollers and microcontroller kits for building digital devices.
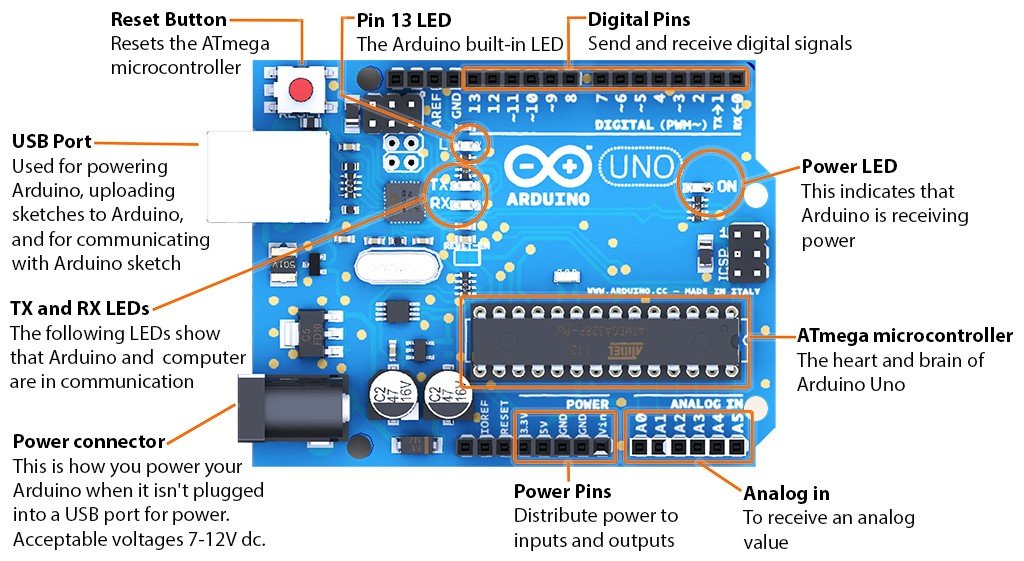
Structure Of Arduino:

1. Reset Button: Resets the ATmega Microcontroller
2. USB Port: The Arduino Due has two USB ports available. The Native USB port (which supports CDC serial communication using the SerialUSB object) is connected directly to the SAM3X MCU. The other USB port is the Programming port. It is connected to an ATMEL 16U2 which acts as a USB-to-Serial converter.
3. TX and RX Leds: RX and TX pins stand for Receiving and Transmitting pins of Arduino used for Serial communication. TX and RX LED are connected to pin no 0 and 1 thus whenever the Arduino send or receive data over serial pins, the LED connected to TX and RX blinks respectively.
4. Power Connector: Power connectors are devices that allows an electrical current to pass through it for the exclusive purpose of providing power to a device
5. Pin 13 LED: PIN 13 is traditionally an output pin that drives an LED.
6. Digital Pins: Digital Pins are Used to read data from some components (sensors) and write data to other components
7. Power LED: It Shows the Flow of Power in Arduino, whether It is ON or OFF
8. ATmega microcontroller: ATMEGA 328 microcontroller, which acts as a processor for the arduino board. Nearly it consists of 28 pins. From these 28 pins, the inputs can be controlled by transmitting and receiving the inputs to the external device.
9. Analog In: The Arduino has a built-in analog-to-digital converter (ADC) that measures the value of analog signals.
10. Power Pins: The input voltage to the Arduino board when it’s using an external power source
Creating LED Glow Project In Arduino
Step 1: Install Python IDLE On your Computer
Download: Python Latest – Version

You can Skip this Part if have Already Installed Python in your Computer, You can Check this By Typing
python --versionStep 2:
Install PySerial To Your Computer
You can PySerial Here
PySerial is a Python API module which is used to read and write serial data to Arduino or any other Microcontroller.
Python Code:
import serial                                                              #Serial imported for Serial communication
import time                                                                #Required to use delay functions
ArduinoUnoSerial = serial.Serial('com15',9600)       #Create Serial port object called ArduinoUnoSerialData time.sleep(2)                                                             #wait for 2 secounds for the communication to get established
print ArduinoUnoSerial.readline()                             #read the serial data and print it as line
print ("You have new message from Arduino")
  while 1:         #Do this forever
            var = raw_input()                                          #get input from user
            if (var == '1'):                                                #if the value is 1
                ArduinoUnoSerial.write('1')                      #send 1 to the arduino's Data code
                print ("LED turned ON")
                time.sleep(1)
             if (var == '0'): #if the value is 0
                ArduinoUnoSerial.write('0')            #send 0 to the arduino's Data code
                print ("LED turned OFF")
                time.sleep(1)
             if (var == 'fine and you'): #if the answer is (fine and you)
                ArduinoUnoSerial.write('0') #send 0    to the arduino's Data code
                print ("I'm fine too,Are you Ready to !!!")
                print ("Type 1 to turn ON LED and 0 to turn OFF LED")
                time.sleep(1)
Arduino Code:
int data;
int LED=13;
void setup() {
  Serial.begin(9600);                               //initialize serial COM at 9600 baudrate
  pinMode(LED, OUTPUT);                    //declare the LED pin (13) as output
  digitalWrite (LED, LOW);                     //Turn OFF the Led in the beginning

  Serial.println("Hello!,How are you Python ?");
}
void loop() {
while (Serial.available())    //whatever the data that is coming in serially and assigning the value to the variable “data”
{
data = Serial.read();
}
if (data == '1')
digitalWrite (LED, HIGH);                  //Turn On the Led
else if (data == '0')
digitalWrite (LED, LOW);                  //Turn OFF the Led
}
So this Was It For the Blog, See you in the Next One Till Then Keep Coding Keep Exploring!
- Introduction to Entrepreneurship: Everything You Need to Know Before You Start - June 12, 2025
- What Sets Artificial Intelligence Apart from Humans? - April 18, 2025
- Python Programming: A Comprehensive Guide for Beginners - March 27, 2025


Could have been more beginner friendly. Try to make the language simpler. So that anybody is able to understand.
Sure Sir 😁